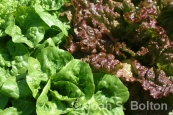
Most often, I write about gardening on the Central Coast of California. Occasionally I hit up national audiences as well, such as this piece, which I recently wrote about planting a spring vegetable garden for the National Education Association’s Member Benefits website.
While the nod to folks in snowy climes might not apply, the push to plant holds true everywhere. And sharing your bounty is simply the right thing to do…
The Spring Garden: Help Yourself While Helping Others
Whether your ground is still frozen, or you’ve been able to garden all winter, early spring is a great time to sneak in a few quick-growing, cool-weather crops before you plan for your summer vegetable garden.
While you’re at it, sow a few extra rows to donate to a local food bank, food pantry or soup kitchen. That way, your own family will benefit from eating fresh, plus you’ll give back to your community.
What to Grow
Cool-season quickies include looseleaf lettuce and salad greens, along with root crops like beets, carrots and radishes.
A bonus about these particular veggies is that because they don’t take up much space, either above or below ground, they’re excellent candidates for containers, too.
Getting Started
If your temperatures are still bitterly cold or your soil is too wet to work, sow your seeds indoors. Lettuce may sprout at 40 degrees, but most other cool-season vegetables germinate at temperatures above 55 degrees.
Use flats, peat pots, pony packs or other containers that are at least 3 inches deep. Or sow in broader containers at least 8 inches deep if those are where your vegetables will live out their lives. Either way, use a lightweight blend of potting soil mixed with generous handfuls of peat moss, perlite or vermiculite.
Note that root crops perform best when sown directly in the ground. Wait until the weather cooperates. Or go ahead and start the seeds indoors, but use deeper containers, so that you won’t impede the descending paths of the roots.
Place the containers in a warm spot, such as near a south-facing window, heater, or on top of a refrigerator. Keep the soil damp. Even moisture is key to good germination.
Once the seeds have sprouted, provide bright, indirect sunlight. After the seedlings have developed several sets of leaves, transplant them to the garden in a spot that receives at least 4 hours of sunshine daily.
Planting Notes
Looseleaf lettuce and salad greens grow fast, and are ready for their first in a series of harvests six weeks after sprouting. Head lettuce takes another two weeks. Once you pluck the single head, you’re done.
Radishes are the speediest roots, ready just four weeks after sprouting. Beets may take longer to germinate. Once they’re up, harvest is 35 to 60 days away. In the meantime, snip the tops to toss in fresh salads.
Carrots can be balky to sprout. Keep the soil moist with damp paper towels, thin cotton dish towels or burlap, or a fine layer of peat moss or compost. Once the ferny tops pop, remove the covering. Your carrots should be ready in 8 to 10 weeks.
Ongoing Care
Protect your tender seedlings from birds and rabbits by suspending a net over the bed, then tucking the edges into the earth.
Irrigate frequently. These crops grow fast, and both leaves and roots can turn bitter if moisture is inconsistent or the soil dries out.
Snails and slugs love to munch and hide in the crinkly folds of looseleaf lettuce. Hand-pick the intruders, bait with a non-toxic control composed of iron phosphate, such as Sluggo or Escar-Go!, or surround the bed with a barrier of copper tape at least 2 inches high.
Harvesting
For looseleaf lettuce and salad greens, use kitchen scissors to snip the outer leaves. The inner core will continue producing for another 4 to 6 weeks, thereby extending the harvest and saving money and trips to the market.
For root crops, check the size by brushing away the dirt on the “shoulders.” Gently pull every third or fourth plant. The next time you harvest, again pull non-consecutive plants. By repeating this, you’ll give neighboring roots more below-ground space, which will encourage them to reach larger — but still sweet — sizes.
Donating Your Crops
Contact a food bank in your area. To find one, search sites like ampleharvest.org or feedingamerica.org.
Ample Harvest provides a central nationwide directory of food pantries so that gardeners can find an outlet for sharing their fresh produce.
Feeding America (formerly America’s Second Harvest) heads a network of more than 200 food banks that service 61,000 agencies in all 50 states, the District of Columbia and Puerto Rico. The group distributed 2.6 billion pounds of food to 37 million Americans last year, and welcomes nutritious donations from home gardeners.
“Most food banks accept fresh produce, or will tell you how to get it to someone,” says Ross Fraser, a Feeding America spokesperson. “We’re probably going to tell you to take it right to a food pantry or to a soup kitchen to cut out the middleman, and to get it to the consumer quickly.”
Consider how perishable your gift might be. “It’s really hard to donate fresh tomatoes because they’re squishy,” Fraser says. “Winter squash is great because it has a long shelf life.”
If you’re enthusiastic but new to vegetable gardening, look for a Plant a Row for the Hungry program in your area.
Garden Writers Association sponsors Plant a Row in 200 cities across the United States, and partners with Feeding America, master gardeners and gardening experts who can offer growing tips. Visit gwaa.org for information.
≈
Copyright, Joan S. Bolton. All rights reserved. Reproduction of text or photos in any form is prohibited without written permission.
≈
